
4D View Pro: More options to customize your worksheets
May 26, 2020
3 min read

To create user-friendly documents, you often need to hide a gridline or header, protect certain cells, or simply change the line color to respect the corporate identity. With 4D v18 R3, you can do all this and more with the new VP SET SHEET OPTIONS command.
Protecting a worksheet prevents the cells within it from being edited. By default, all of a 4D View Pro document’s cells are marked as locked. If you want to protect your entire worksheet, you just need to write:
$options:=New object

// Activate protection

$options.isProtected:=True

// Apply protection on the current sheet

VP SET SHEET OPTIONS ("ViewProArea";$options)
If you want to allow users to edit specific cells, you can protect the worksheet and unlock only the cells the user can edit.
As the previous example demonstrated, setting the isProtected option to True protects the entire worksheet. If you want all of the cells protected except the C5:D10 range, simply mark the range as unlocked:
$options:=New object

// Activate protection

$options.isProtected:=True

// Apply protection on the current sheet

VP SET SHEET OPTIONS ("ViewProArea";$options)

// mark cells C5:D10 as 'unlocked'

VP SET CELL STYLE (VP Cells ("ViewProArea";2;4;2;6);New object("locked";False))
The protectionOptions property can be used to specify what you allow a user to change, such as resizing, dragging, inserting or deleting rows and columns, and so on.
Want to protect your document but allow users to resize rows and columns? You can write this:
$options:=New object

// Activate protection

$options.isProtected:=True

$options.protectionOptions:=New object

// Allow user to resize rows

$options.protectionOptions.allowResizeRows=True;

// Allow user to resize columns

$options.protectionOptions.allowResizeColumns=True;

// Apply protection on the current sheet

VP SET SHEET OPTIONS ("ViewProArea";$options)
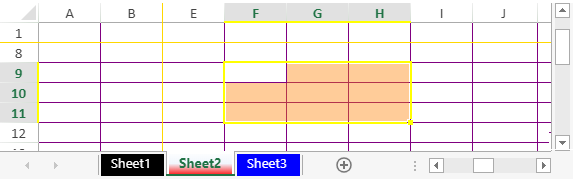
The VP SET SHEET OPTIONS command also lets you customize the colors of your worksheet’s tabs, frozen lines, grid lines, or a selection’s background and border.
$options:=New object

// Customize color of Sheet 1 tab

$options.sheetTabColor:="Black"

$options.gridline:=New object("color";"Purple")

$options.selectionBackColor:="rgba(255,128,0,0.4)"

// Use rgba() for the transparency. Here : 40% transparency

$options.selectionBorderColor:="Yellow"

$options.frozenlineColor:="Gold"

VP SET SHEET OPTIONS ("ViewProArea";$options;0)


// Customize color of Sheet 2 tab

$options.sheetTabColor:="red"

VP SET SHEET OPTIONS ("ViewProArea";$options;1)


// Customize color of Sheet 3 tab

$options.sheetTabColor:="blue"

VP SET SHEET OPTIONS ("ViewProArea";$options;2)
Here’s the result:
VP SET SHEET OPTIONS command even lets you manage the visibility of the worksheet’s grid lines and row and column headers:
$options:=New object

$options.gridline:=New object()

$options.gridline.showVerticalGridline:=False

$options.gridline.showHorizontalGridline:=False

$options.rowHeaderVisible:=False

$options.colHeaderVisible:=False

VP SET SHEET OPTIONS ("ViewProArea";$options)
Take a look at the result:
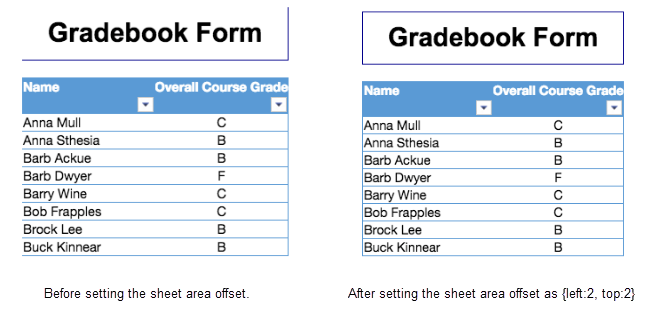
Because borders are drawn on the outside of cells, you can use the sheetAreaOffset property to make sure that the whole worksheet is rendered:
$options:=New object

$options.sheetAreaOffset:=New object

$options.sheetAreaOffset.left:=2

$options.sheetAreaOffset.top:=2

VP SET SHEET OPTIONS ("ViewProArea";$options)
Find more information on the doc center and don’t forget to try this command with the HDI above.
Got a question, suggestion or just want to get in touch with the 4D bloggers? Drop us a line!
* Your privacy is very important to us. Please click here to view our Policy
Comments are not currently available for this post.