
Customize the style of your 4D View Pro documents
August 8, 2019
3 min read

With 4D v17 R6, you can programmatically customize the style of your 4D View Pro documents. There’s three ways to go about it, you can: 1) use the default style commands to define the general style of a sheet, 2) use the stylesheet commands to define frequently used custom styles, and finally 3) use the cell style commands to define the style of specific cells.
The style commands use an object which allows you to define, for example: the foreground and background colors, cell background image, borders, cell padding, font, horizontal and vertical alignment, text decoration, and text indentation.
To define a default style use these commands:
To define a style sheet use:
And if you want to set or get a cell style or apply a style sheet use:
You can define the general style of your entire sheet easily by creating a default style. No need to use a range, just pass your style object to the VP SET DEFAULT STYLE command and you’re done. Thanks to the default style, you can drastically reduce the size of your document because the style is saved once with the document and not repeated in every cells.
Here is a code snippet to define the default font and background color of your sheet:
$style:=New object

$style.font:="14pt Arial"

$style.backColor:="#F0FFFF"

VP SET DEFAULT STYLE ("ViewProArea";$style)
If multiple cells need to use the same style, create a style sheet with VP ADD STYLESHEET and apply it on all cells. This way you can update the style of all cells (if necessary) at the same time.
Here’s some code to use borders and create tables in your document:
// Create the border style

$style:=New object

$style.font:="18pt Arial"

$style.backColor:="#FF1493"


// create your stylesheet in the document

VP ADD STYLESHEET ("ViewProArea";"Table";$style)


// Apply the style

VP SET CELL STYLE (VP Cells ("ViewProArea";1;1;10;10);New object("name";"Table"))
You can also apply your style directly to specific cells thanks to the VP SET CELL STYLE command. Note that this means that your entire style object is copied to all of the specified cells. This can affect the size of your document.
For example, if you need to display a picture in a the background of a single cell:
  // create style object

$style:=New object

$style.backgroundImage:=Get 4D folder(Current resources folder)+"4D.png"

$style.backgroundImageLayout:=vk image layout center


  // Apply the style to specific cells

VP SET CELL STYLE (VP Cell ("ViewProArea";1;1);$style)
Because managing the borders of a range can be complex with the style attributes, we’ve added the new VP SET BORDER command.
For example, if you need to add a bold border style to the outside of your range with a lighter border style on the inside, like this:
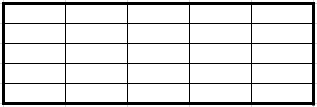
You can use this:
$range:=VP Cells ("ViewProArea";1;1;5;5)


  // define border style

$border:=New object("color";"black")


//Apply the style to the left, top, right, and bottom borders of the range

$border.style:=vk line style thick

VP SET BORDER ($range;$border;New object("outline";True))


//Apply the style to  the inner horizontal and vertical borders of the range

$border.style:=vk line style thin

VP SET BORDER ($range;$border;New object("inside";True))
More details can be found in the doc center.
Got a question, suggestion or just want to get in touch with the 4D bloggers? Drop us a line!
* Your privacy is very important to us. Please click here to view our Policy
Comments are not currently available for this post.