by Mourad Aouinat, Software Engineer at 4D Morocco
In a previous blog post, we saw how easy setting up a REST API using 4D. In this blog post, we will leverage the powerful 4D REST API in combination with React to build a To-Do app that includes features to open todos, create new ones, modify existing ones, and features for bulk modification and bulk deletion.
Full Application: TODO app using ReactJS and 4D REST API
Setting up the ReactJS app
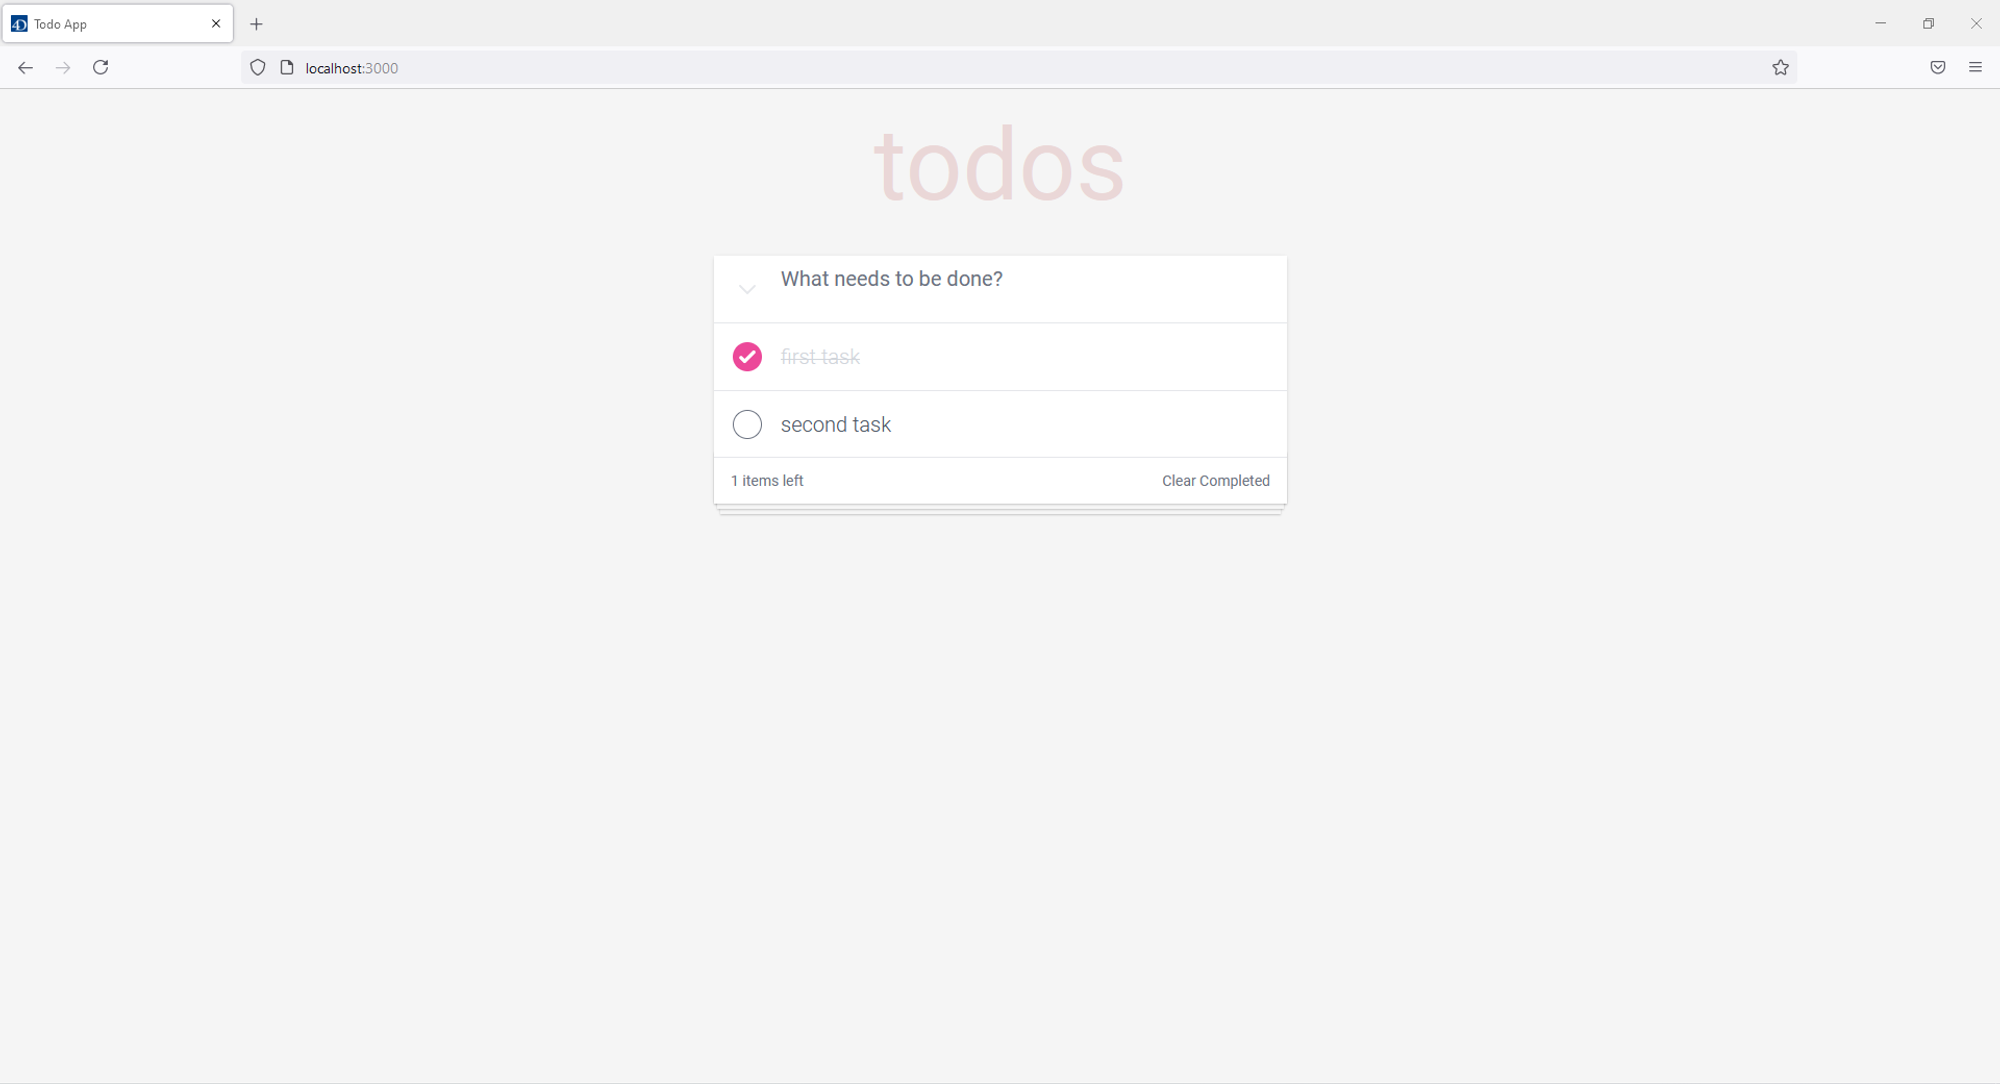
In this tutorial, we will build a simple, beautiful Todo App.
This tutorial is the follow-up of the 4D REST server tutorial. It assumes that you have experience with ReactJS, and have Node.js 12.13.0 or higher installed on your computer.
First, paste this command into your terminal to clone the project files:
git clone https://github.com/mouradaouinat/todo-fd.git
After you clone the project, change directories to the root of the project:
cd todoapp
To follow along with the steps of this tutorial, switch branch to the starter files:
git checkout starter
If you want to skip ahead and go straight to the finished app, switch to the complete branch:
git checkout complete
Install the dependencies:
npm install
And then start the project by running:
npm start
This is what you are going to see:

Configuring the proxy server
To connect to your 4D rest server, make sure to configure the app’s dev server to the same rest API URL as the one you’ve configured on 4D:
"/rest":{
       target: ADDRESS:PORT,
       secure: false,
},
// craco.config.js

module.exports = {
  devServer: {
    proxy: {
      "/rest": {
        target: "http://127.0.0.1:4000",
        secure: false,
      },
    },
  },
  style: {
    postcss: {
      plugins: [require("tailwindcss"), require("autoprefixer")],
    },
  },
};
Connecting the app to the 4D REST API
STEP 1: Getting Todos
First, we make sure that the 4D server is up and running, then we fetch the initial todo data using the built-in JavaScript fetch method.
To get the todos in Array format instead of the JSON object you just have to add $asArray to your REST request (e.g., $asArray=true).
// src/components/Todos.tsx

import { useEffect } from "react";
import { useTodos } from "../Provider";
import TodoItem from "./TodoItem";

const Todos: React.FC = () => {
  const { todos, setTodos } = useTodos();

  useEffect(() => {
    fetch("/rest/Tasks/?$asArray=true")
      .then((resp) => resp.json())
      .then((todos) => setTodos(todos))
      .catch(console.error);
  }, [setTodos]);

  return (
  <ul className="section-list">
  {todos.map((todo) => (
    <TodoItem todo={todo} key={todo.id} />
 ))}
</ul>
); };
export default Todos;
STEP 2: Adding a Todo
To add a new Todo, we send a POST request to /rest/Tasks/?$method=update. The $method=update part allows you to update and/or create one or more entities in a single POST request.
The response is the newly created todo with additional properties, __KEY, and __STAMP that we’re going to need to update each todo:
// src/components/AddTodo.tsx

import React, { useState } from "react";
import { HiOutlineChevronDown } from "react-icons/hi";
import { useTodos } from "../Provider";

const AddTodo: React.FC = () => {
  const { todos, setTodos } = useTodos();
  const [input, setInput] = useState("");
  const allChecked = todos.every((todoItem) => todoItem.completed);

  function handleAddTodo(e: React.KeyboardEvent) {
    if (e.key === "Enter" && input) {
      const newTodo = {
        title: input,
        completed: false,
      };

      fetch("/rest/Tasks/?$method=update", {
        method: "POST",
        body: JSON.stringify(newTodo),
      })
        .then((res) => res.json())
        .then((newTodo) => {
          setTodos((state) => [newTodo, ...state]);
          setInput("");
        })
        .catch(console.error);
    }
  }

  function handleChange({
    target: { value },
  }: React.ChangeEvent) {
    setInput(value);
  }
return (
  <div className="todo-prompt">
    <div className="todo-prompt__container">
    {todos.length ? ( <
    button
    className="todo-prompt__toggle"
    onClick={() => {
     setTodos((state) => {
        if (allChecked) {
               return state.map((item) => ({ ...item, completed: false, })); }
        else { return state.map((item) => ({ ...item, completed: true, }));
   } }); }} >
   <HiOutlineChevronDown className="todo-prompt__toggle-icon" /> </button> ) : null}
   </div>
 <input
  type="text"
  placeholder="What needs to be done?"
  className="todo-prompt__input"
  value={input}
  onChange={handleChange}
  onKeyDown={handleAddTodo}
 />
</div>
);
};

export default AddTodo;
STEP 3: Updating a Todo
To update an entity, you must pass the __KEY and __STAMP parameters in the object along with any modified attributes. If both of these parameters are missing, an entity will be added with the values in the object you send in the body of your POST.
We’re implicitly passing the __Key and __STAMP using the JavaScript spread operator in this example:
// src/components/TodoItem.tsx

import { useState } from "react";
import DeleteBtn from "./DeleteBtn";
import { useTodos } from "../Provider";
import { ITodo } from "../interfaces";

const TodoItem: React.FC<{ todo: ITodo }> = ({ todo }) => {
  const { setTodos } = useTodos();
  const [isEditing, setIsEditing] = useState(false);
  const [inputValue, setInputValue] = useState(todo.title);

  function handleCompleted() {
    fetch("/rest/Tasks/?$method=update", {
      method: "POST",
      body: JSON.stringify({
        ...todo,
        completed: !todo.completed,
      }),
    })
      .then((res) => res.json())
      .then(({ __STATUS, uri, ...rest }) => {
        if (__STATUS.success) {
          setTodos((todos) => {
            return todos.map((item) => {
              if (todo.id === item.id) {
                return rest;
              }

              return item;
            });
          });
        }
      })
      .catch(console.error);
  }

  function updateTodoTitle() {
    fetch("/rest/Tasks/?$method=update", {
      method: "POST",
      body: JSON.stringify({
        ...todo,
        title: inputValue,
      }),
    })
      .then((res) => res.json())
      .then(({ __STATUS, uri, ...rest }) => {
        if (__STATUS.success) {
          setTodos((todos) => {
            return todos.map((item) => {
              if (todo.id === item.id) {
                return rest;
              }

              return item;
            });
          });
        }
      })
      .catch(console.error);

    setIsEditing(false);
  }

  function handleKeyDown(e: React.KeyboardEvent) {
    if (e.key === "Escape") {
      setInputValue(todo.title);
      setIsEditing(false);
    }

    if (e.key === "Enter") {
      updateTodoTitle();
    }
  }

  return (
   <li
   className="todo-item"
   onDoubleClick={() => {
   if (!todo.completed) { setIsEditing(true);
}
}} >
{isEditing ? (
  <input
  className="todo-item__input"
  autoFocus value={inputValue}
  onChange={({ target: { value } }) => {
     setInputValue(value);
   }}
  onBlur={updateTodoTitle}
  onKeyDown={handleKeyDown}
 />
) : (
<div className="todo-item__container">
 <div className="todo-item__devider">
  <input
   type="checkbox"
   className="todo-item__checkbox"
   checked={todo.completed}
   onChange={handleCompleted} />
</div>
<label
  className={`todo-item__title ${
   todo.completed
   ? "todo-item__title--completed"
   : "todo-item__title--active"
  }`}
>
{todo.title}
</label>
<div className="todo-item__delete-btn group-hover:flex">
 <DeleteBtn id={todo.id} />
</div>
</div>
)}
</li>
);
};
export default TodoItem;
STEP 4: Deleting a Todo
In our app, a todo is a specific Entity in the Tasks dataclass. To delete a todo, we’re going to send a POST request with query param ?$method=delete and pass the todo id as follows: id /rest/DataClass(id)/?$method=delete
// src/components/DeleteBtn.tsx

import React from "react";
import { ImCross } from "react-icons/im";
import { useTodos } from "../Provider";

const DeleteBtn: React.FC<{ id: number }> = ({ id }) => {
  const { setTodos } = useTodos();

return (
 <button
  onClick={() => {
  fetch(`/rest/Tasks(${id})/?$method=delete`, {
   method: "POST",
 })
 .then((res) => {
  if (res.ok) {
  setTodos((todos) => todos.filter((todo) => todo.id !== id));
}
})
.catch(console.error);
}}
> <ImCross className="todo-item__delete-icon" /> </button> ); };

export default DeleteBtn;
STEP 5: Bulk Updating
Updating multiple entities is the same as updating a single entity, but instead of passing one todo, we’re going to pass an array of todos to the body of the POST request:
// src/components/AddTodo.tsx

import React, { useState } from "react";
import { HiOutlineChevronDown } from "react-icons/hi";
import { useTodos } from "../Provider";

const AddTodo: React.FC = () => {
  const { todos, setTodos } = useTodos();
  const [input, setInput] = useState("");
  const allChecked = todos.every((todoItem) => todoItem.completed);

  function handleAddTodo(e: React.KeyboardEvent) {
    if (e.key === "Enter" && input) {
      const newTodo = {
        title: input,
        completed: false,
      };

      fetch("/rest/Tasks/?$method=update", {
        method: "POST",
        body: JSON.stringify(newTodo),
      })
        .then((res) => res.json())
        .then((newTodo) => {
          setTodos((state) => [newTodo, ...state]);
          setInput("");
        })
        .catch(console.error);
    }
  }

  function handleChange({
    target: { value },
  }: React.ChangeEvent) {
    setInput(value);
  }

  function toggleAllTodosCompleted() {
    fetch("/rest/Tasks/?$method=update", {
      method: "POST",
      body: JSON.stringify(
        todos.map((todo) => ({ ...todo, completed: allChecked ? false : true }))
      ),
    })
      .then((res) => {
        if (res.ok) {
          fetch("/rest/Tasks/?$asArray=true")
	          .then((resp) => resp.json())
	          .then((todos) => setTodos(todos))
			      .catch(console.error);
        }
      })
      .catch(console.error);
  }
return (
  <div className="todo-prompt">
   <div className="todo-prompt__container">
   {todos.length ? (
   <button
   className="todo-prompt__toggle"
   onClick={toggleAllTodosCompleted}
 >
<HiOutlineChevronDown className="todo-prompt__toggle-icon" />
</button> ) : null}
</div>
<input
 type="text"
 placeholder="What needs to be done?"
 className="todo-prompt__input" value={input}
 onChange={handleChange}
 onKeyDown={handleAddTodo}
/>
</div>
);
};
export default AddTodo;
STEP 6: Bulk Deleting
We can also delete multiple todos with a single POST request using the $filter query parameter. The lines below delete all the completed todos:
/rest/Tasks/?$filter=”completed=true”&$method=delete
// src/components/Footer.tsx

import { useTodos } from "../Provider";

const Footer: React.FC = () => {
  const { todos, setTodos } = useTodos();

  function handleDeleteCompleted() {
    fetch('/rest/Tasks/?$filter="completed=true"&$method=delete', {
      method: "POST",
    })
      .then((res) => {
        if (res.ok) {
          setTodos((state) => {
            return state.filter((item) => !item.completed);
          });
        }
      })
      .catch(console.error);
  }
return todos.length ? (
  <div className="app-footer">
   <span>{todos.filter((item) => !item.completed).length} items left</span>
   <div className="app-footer__action-box">
    {todos.some((item) => item.completed) ? (
     <button
      className="app-footer__clear-btn"
      onClick={handleDeleteCompleted}
     >
   Clear Completed
   </button>
    ) : null}
 </div>
</div>
) : null;
};

export default Footer;
Takeaway
As we saw in this article, the 4D REST Server comes out of the box packed with features to quickly get up running when developing applications. Feel free to ask any questions you might have on the 4D forum!

