4D Blog

Home Tips Building Dynamic Data Management in Qodly application: Create, Add, Edit, and Delete

Building Dynamic Data Management in Qodly application: Create, Add, Edit, and Delete

March 24, 2025

Tips

In our series on 4D Qodly Pro, we have explored how to display data using a datatable. Today, we’ll take the next step: learning how to add, edit, and delete records. These operations are essential for creating dynamic, interactive applications.

To demonstrate these features, we’ll continue with our performance review management application. The goal is to design a screen that enables users to add or modify employee information. This project is available on GitHub for reference.

Performance Review Application

Adding create and edit buttons

Beside the datatable, we add two buttons: Create and Edit.

You have two options for displaying the data entry form:

  • Inline Form Display: Show the input form next to the datatable when the user clicks “Create” or “Edit” buttons. The form can be toggled on or off using states. Conditional or non-conditional states provide flexibility, and we’ll dedicate a future blog to this topic. For now, if you’re eager to learn about states, refer to this State overview documentation and this Dynamic User Interfaces with Page States blog.
  • Modal Dialog Display: Open the form in a modal dialog when the user clicks “Create” or “Edit” buttons. This is the approach we’ve chosen for this tutorial.

Create a dialog

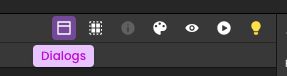
To create a dialog, click on the dialog button in the top bar.

blank

You have several properties available to customize your dialog:

  • Overlay: Activates a screen overlay when set to true.
  • Draggable: Enables user-driven repositioning. Features a customizable move icon.
  • Closable: Integrates a close function, operable via the button or by clicking outside the dialog.
  • Animated: Implements an opening flicker effect for visual emphasis.


For further details, please refer to the dialog documentation.

Building a Data Entry Form

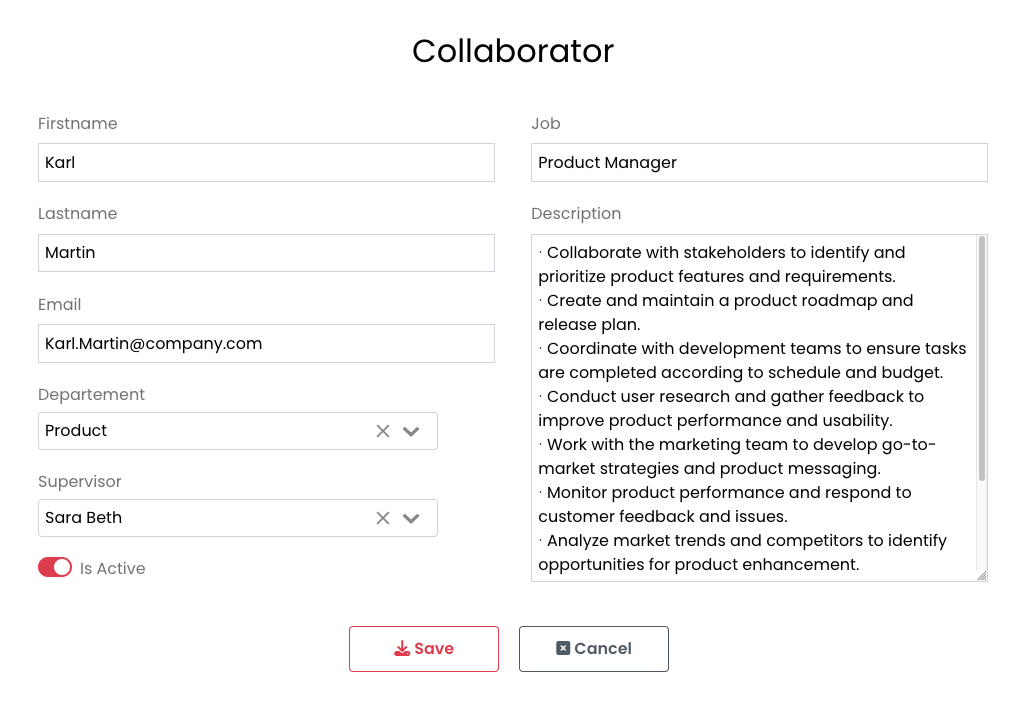
We’ll now create a data entry form to collect employee information. This form will allow users to create or update database entries.

blank

Linking the Form to the Data Source

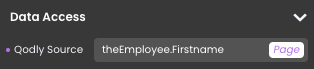
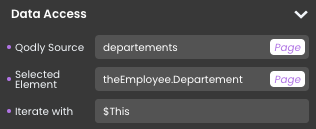
As a reminder, in the previous blog, we created a datatable linked to the employees datasource and connected the selected element to the “theEmployee” datasource. This “theEmployee” datasource will populate the input form.

Adding Input Fields

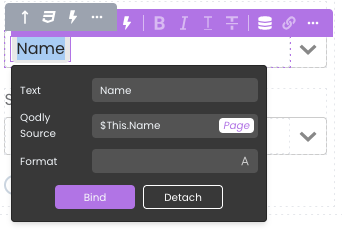
For basic fields such as firstname, lastname, email, and job, we use the Text Input component.

Example: Configuring the Firstname Field

  • Drag a Text Input component into the form.
  • Set the Qodly source property to “theEmployee.Firstname”.


blank

Repeat this process for the other fields by linking them to the appropriate attributes of “theEmployee”.

Configuring Long Text Fields

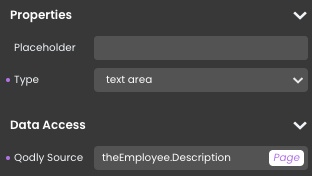
For longer text fields like description, we also use the Text Input component but configure it as a Text Area:

  • Drag a Text Input component into the form.
  • Change the Type property to Text Area.
  • Set the Qodly source to “theEmployee.Description”.


blank

Dropdown Menus for Departments and Managers

For fields like department and manager fields, we use the Select Box component, which allows users to select predefined values.

  • Create the data source: “department” of type entity,
  • Drag a Select Box component,
  • Set “theEmployee.Departement” as the Qodly source and “department” as the selected element.


blank

  • Define the placeholder property with the text “Department”,
  • Drag a Text Input component inside the Select Box,
  • Linked the Text input to the source “$This.Name”.


blank

Check box with Switch look

For boolean field like “isActive”, we use the Check box component. To have a modern look, we use the Switch look.

  • Drap a Check Box component into the form,
  • Change the Variant property to Switch,
  • Set the Qodly source to “theEmployee.isActive”.


blank

Managing Actions

4D Qodly Pro simplifies the creation, saving, and deletion of records by providing built-in standard actions, similar to those in 4D.

Example: Save Action

  • Add a button and label it Save.
  • In the Events panel, under the On Click action, click Add Standard Action.
  • Enter the datasource (in this case, theEmployee) and select the Save action.
  • Enable the Provide Feedback checkbox to customize the handling of unexpected error messages, determining what will be displayed to end users.


blank

Custom Functions for Business Logic

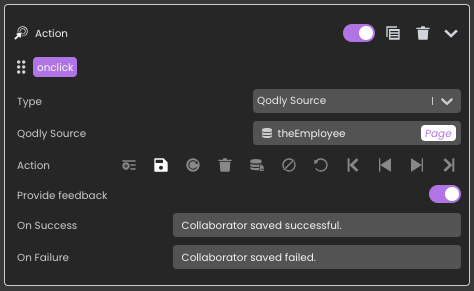
In addition to standard actions, you can call custom functions for operations like creating, deleting, or saving records. For instance:

  • Validate data before saving.
  • Perform calculations to populate additional fields.


In this application, we’ve kept things simple by relying on standard actions, you can explore all the possibilities of standard actions in the Qodly documentation.

Refreshing the Datatable After Updates

After adding or editing a record, it’s important to refresh the datatable to reflect the changes. This is easily achieved with the Reload action.

To refresh the datatable after saving:

  • Add the Reload action to the employees datasource linked to the datatable.
  • Assign this action to the Save button along with the Save action.

Opening and closing the Modal Dialog

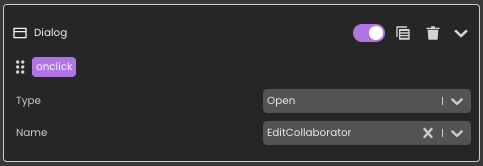
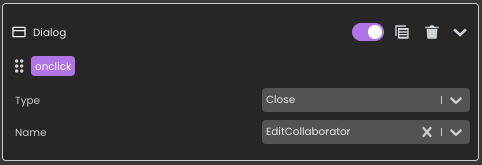
To enhance user interaction, associate the appropriate dialog actions with the modal dialog:

  • On the Edit and Create buttons, add the Open Dialog action.


blank

  • Inside the dialog, on the Save and Cancel buttons, add the Close Dialog action.


blank

Next Steps

Congratulations! You now have a fully functional system to add, edit, and delete data. To further explore the wide range of components available for building Qodly pages, check out the comprehensive documentation on Qodly components.

Let us know your thoughts and share your progress on the 4D forum. Stay tuned for our next blog, where we’ll discuss states to dynamically control your UI.

Discuss

Tags 4D Qodly Pro, CRUD, Input control, Performance Review Application, Qodly Studio, Tutorial

Latest related posts

  • September 15, 2025

    Find the right spot in your 4D Write Pro document with AI

  • September 2, 2025

    Intelligent 4D Write Pro document analysis with AI

  • August 25, 2025

    ORDA – Constructor and touched event – Detailed behaviour through a network

Vanessa Talbot
Vanessa Talbot
• Product Owner •Vanessa Talbot joined 4D Program team in June, 2014. As a Product Owner, she is in charge of writing the user stories then translating it to functional specifications. Her role is also to make sure that the feature implementation delivered is meeting the customer need.Since her arrival, she has worked to define key features in 4D. She has worked on most of preemptive multi-threading new features and also on a very complex subject: the new architecture for engined application. Vanessa has a degree from Telecom Saint-Etienne. She began her career at the Criminal Research Institute as a developer for the audiovisual department. She has also worked in media and medical fields as expert in technical support, production as well as documenting new features.
  • Deutsch
  • Français
  • English
  • Português
  • Čeština
  • Español
  • Italiano
  • 日本語

Categories

Browse categories

  • AI
  • 4D View Pro
  • 4D Write Pro
  • 4D for Mobile
  • Email
  • Development Mode
  • 4D Language
  • ORDA
  • User Interface / GUI
  • Qodly Studio
  • Server
  • Maintenance
  • Deployment
  • 4D Tutorials
  • Generic
  • 4D Summit sessions and other online videos

Tags

4D AIKit 4D for Android 4D for iOS 4D NetKit 4D Qodly Pro 4D View Pro 4D Write Pro 20 R10 21 21 R2 Administration AI Artificial Intelligence Build application CI/CD Class Client/Server Code editor Collections Formula Listbox Logs Mail Microsoft 365 Network Objects OpenAI ORDA PDF Pictures Preemptive Programming REST Scalability Security Session Source control Speed Spreadsheet Tutorial UI User Experience vscode Web Word processor
Subscribe to 4D Newsletter

© 2026 4D SAS - All rights reserved
Terms & Conditions | Legal Notices | Data Policy | Cookie Policy | Contact us | Write for us


Subscribe to 4D Newsletter

* Your privacy is very important to us. Please click here to view our Policy

Contact us

Got a question, suggestion or just want to get in touch with the 4D bloggers? Drop us a line!

* Your privacy is very important to us. Please click here to view our Policy