
4D Backup, VSS snapshots and the new commands to lock the datastore
April 25, 2023
6 min read

4D provides you with multiple built-in ways to backup your data: 4D backup and the use of a mirror server. With 4D v20, 4D exposes internal commands to lock the datastore, allowing you to copy your data while 4D is running.
First, let’s speak about the different means to backup your data with 4D.
The build in backup is not only making an automatic full copy of your data file, it also manages a transaction log containing every operations happening in your data. This is the best protection for your work. If anything happens, such as power loss, damaged hard disk or system crash, on the next start 4D will automatically detect the failure and – if needed – integrate the missing operations from the log or run a full restore plus log integration. That’s why we recommend 4D Backup for most use cases.
Read https://developer.4d.com/docs/Backup/overview for more details.
For 24/7 installations where you cannot lock the data file for a full backup or where you want minimum restore time, what you need to use is a mirror server. 4D will automatically replicate every changes on the mirror server so if your main server fails your mirror server can be live in a matter of seconds.
Setting up a mirror configuration is more work and is more complicated than using the backup. We already helped a lot of our customers deploying this configuration, so don’t hesitate to contact 4D’s Professional Service Team for help and advice.
Especially with virtual environments system administrators prefer to use Volume Shadow Copy (VSS) based snapshots. 4D supports this with it’s own 4D VSS Writer. Read https://blog.4d.com/enterprise-virtual-machine-snapshot-support/ for details.
Be careful as it doesn’t replace 4D Backup as a snapshot only contains the data from a given moment. Every operations that happened after the snapshot can’t be retrieved as you lack the journal and transaction log.
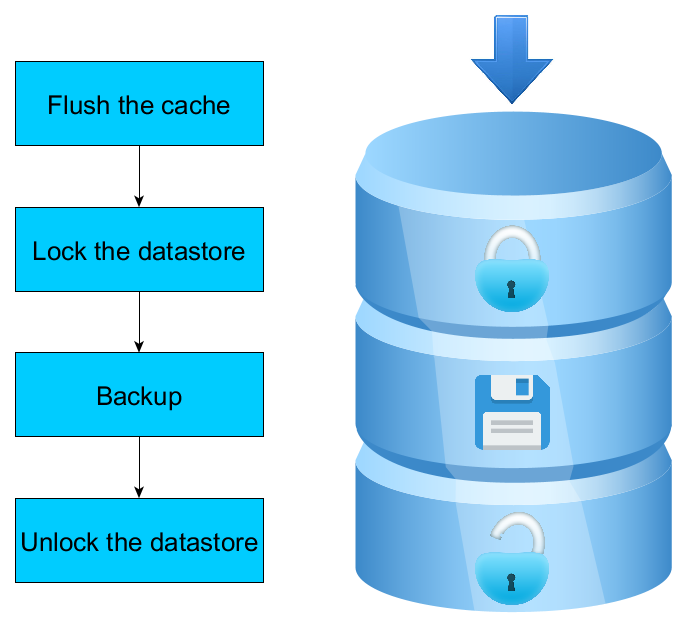
A visual explanation of how 4D Backup works
I’ll let the mirror backup aside as it’s a very different way of saving your data and concentrate on how 4D Backup and 4D VSS work.
The first point to take into consideration is that 4D doesn’t immediately apply every change on the data file in real time. Doing this would ask for too many disk accesses, significantly affecting the performance of your application. 4D uses a cache in memory, where all your changes are first applied, and regularly 4D flushes the cache, applying all the changes on the data file in one go. So when the backup starts or when VSS is called, 4D first flushes the cache for the data file to contain up to date data.
Another important point to take into consideration is that copying a data file while it is in use doesn’t work: If the data file is modified while being copied, the resulting data file can be corrupted or you can have differences between the data file and the journal or indexes. So the second step is to lock the data file by preventing write operations during the copy. Read operations are still supported, but every process who tries to perform a write operation will be blocked until the backup/VSS snapshot is over.
Finally, let me tell you about the journal. The journal contains all the operations you have made since your last backup. It is used in 2 main cases: If your data file gets corrupted or if you want to revert some unfortunate user operations. This is a very important file if you don’t want to lose a single modification of your data file.
So, once the cache is flushed and the data file is locked, 4D backup (but not VSS) creates a new journal file. Then the data file, the index file and the journal can be copied, before unlocking the data.
As you can see the whole operation is quite complex. That’s why we strongly encourage our customers to use the 4D backup as it’s both fully automated and safe. Still, some of you build their own snapshot mechanism. For them, we have brought you the ability to lock the datastore while 4D is running!
We provided you with 3 new commands: ds.flushAndLock(), ds.locked() and ds.unlock().
ds.flushAndLock() flushes the cache and then locks the datastore for the other processes. While the datastore is locked, all write operations coming from other processes will be put on hold until it is unlocked. So from that moment on, you know that neither your data file, your index file nor your journal will be altered, allowing you to freely copy them and be sure they are synchronized and not corrupted.
Once you have finished your copy, you can call ds.unlock() in the same process. It will release the lock on the datastore, allowing write operations to happen again.
The command ds.locked() will tell you if a process has currently locked the datastore.
With these 3 commands, you can now reproduce the way 4D backup and VSS lock the datastore before copying it.
To illustrate this new feature, let me give you a snippet of code. This code performs an archive of the data folder (and as such of the data and index files) and of the journal:
$destination:=Folder(fk documents folder).folder("Archive")
$destination.create() // The folder where we will copy the archive
ds.flushAndLock() // We first lock the datastore, blocking write operations from other processes

$dataFolder:=Folder(fk data folder)
$dataFolder.copyTo($destination) // We can now copy the data folder

$oldJournalPath:=New log file() // We create a new journal
$oldJournal:=File($oldJournalPath; fk platform path)
$oldJournal.moveTo($destination) // We move the old journal

ds.unlock() // Our copy is over, we can now unlock the datastore
As you can see, even if the code is quite small, a lot of important steps have to be done to be sure that the archive is not corrupted: the code takes care of flushing the cache and locking the datastore, creating a new journal and saving the old one, and of course unlocking the datastore at the end of the operation. I encourage you to use this piece of code as a base for your own snapshot mechanisms so you don’t forget an important step.
That’s all for now. I hope this blog post helps you understand better the internal functioning of the 4D Backup.
And of course, if you have questions or comments, don’t hesitate to bring them to the forum.
Got a question, suggestion or just want to get in touch with the 4D bloggers? Drop us a line!
* Your privacy is very important to us. Please click here to view our Policy
Comments are not currently available for this post.